Thursday, April 19, 2012

Corner China Cabinet Design (and Dining Table)

Well, the Greene & Greene inspired Corner China Cabinet has morphed into two projects; a new Dining Table for our Breakfast Nook and the China Cabinet.  I believe I will start on the Dining Table first.  We just need something simple, so it should go fast (famous last words).  All of my kitchen cabinets near the Breakfast Nook are all maple and I would like to introduce some darker woods into the area.  So I have decided to make the table top out of cherry and the legs and aprons out of maple in a simple shaker style.  Below are the SketchUp models I have come up with so far.  Any and all comments are welcome.  


As for the G&G Corner China Cabinet, I still have a few issues to work out.  I may, or may not, need some embellishments on the side posts that become the feet.  And I’m still working out what type of hinges I want to use for the door.  For my G&G Jewelry Cabinet (see blog archive) I used SOSS hinges.  While I liked the incognito appearance and functionality, I found them quite fussy to install.  Call me a blasphemer, but I would really like to use some soft-close blum euro hinges for this.  I believe they would support the heavy door and could be adjusted down the road for any sagging.  But I don’t believe they make any models that would work with the design I have so far.  Please let me know if you have a solution or better idea.

I hope to get started soon and will post with updates.  Last weekend I purchased most of the wood I’ll need for both projects.  It has had almost a week to acclimate to my shop environment, so I will probably start milling the boards for the dining table this weekend.

Thanks for stopping by,

TexWood

Monday, March 19, 2012

Thoughts on my Next Project – Corner China Cabinet


After much deliberation with the finance and requisition committees, it was decided that my next project will be a Corner China Cabinet.  This will be the first project I will have an opportunity to blog about during the design and build.  For now, I have been searching and looking at various types and designs of China Cabinets for inspiration (or to find the perfect piece to rip-off).  Of course my go-to meme is Greene & Greene, but I may look at something a little more contemporary this time.  But before I can address the overall design, there are some preliminary issues I need to resolve first.

·         One door or two?
·         Do we need storage in the bottom of the cabinet?
·         How much extra support do I need for glass paneled doors?
·         What is the best way to add lighting?

I plan on starting with some SketchUp work this week to help narrow the options…so stay tuned

Thanks for dropping by,

TexWood

Sunday, February 5, 2012

Get Woodworking Week – Pocket Holes?


This post is geared toward those that are thinking about taking a dip into this wonderful hobby/craft we call Woodworking.  The brainchild of Tom Iovino of Tom’s Workbench, bloggers around the Woodworking community will be posting articles geared toward the beginning Woodworker.  So, if you have been perusing the forums, blogs, woodworking websites, and the occasional PBS woodworking TV show, the techniques, tools and required competence must seem overwhelming.  Rest assured anyone considering this hobby has been in your shoes. 

So, where do you start?  My first and strongest recommendation is to start with Popular Woodworking magazine’s “I Can Do That” articles.  They are free and very informative for the beginner.  Each project can be completed over a weekend with a basic set of tools.  Start out by reading their free Online Manual that will go over the basic tool-kit and techniques. They have quite a variety of projects to build, from the traditional to the contemporary.  Not only will these projects build your confidence and skills, but will also please that certain someone on the finance committee. 

Speaking of the finance committee, what is the one starter tool I would say you can’t live with out?  Easy – the pocket-hole jig.  In my opinion, the one area that frustrates most beginners is joinery; the “simple” task of fastening one board to another.  The pocket-hole joint allows you to join two boards together, simply, quickly, and strongly.  Don’t be intimated by naysayers who say the pocket-hole joinery is not “fine woodworking”.  You can build many “fine” projects with pocket-holes joinery.  Once you have mastered a few projects, your confidence will grow and will start to try other more complicate joints.  But trusty pocket-hole jig will always be useful tool in any shop.  While, I rarely use the pocket-hole joint any more in my furniture projects, I use them all the time in my shop furniture and shop made jigs.  The miter saw stand, out-feed/assembly table, and the tool stand pictured below were all made using pocket-hole joinery. 


The biggest drawback to pocket-holes is that they are visible from one side.  Yes, they make plugs to fill the pocket-holes, but to be honest don’t waste your money on those.  They will never truly conceal the pocket hole.  What you need to do, is plan ahead and make sure the visible side of joint is hidden or concealed from view, like on the underside or back of a piece. 

So what pocket-hole jig should I buy?  I have one of the ever popular Kreg jigs and have been quite satisfied with it.  One of the best things about the Kreg Jigs is that they and their accessories (screws, clamps, etc.) are available at most, if not all, Lowes stores.  So, if you run out of the specialty screws you only have to go as far as your local Lowes to pick up some more.  Although I have not used one, the Porter-Cable Pocket-Hole Jig also looks to be quite good.  The two things I would strongly recommend is buying a surface vise-grip like clamp and a right-angle clamp.  With those in your arsenal, you can handle just about any situation. 

I hope this post has given you some food for thought from my perspective.  Be sure to check out Popular Woodworking magazine’s “I Can Do That” articles.  And please feel free to give me your feedback.

Thanks for stopping by,


TexWood

Wednesday, January 25, 2012

G&G Frames and WIA 2012


Okay it has been awhile…work, the holidays, my Wife’s’ birthday, our anniversary, and my Mom’s birthday have taken their toll on my free time.  To that end, I wanted to share some of my gift projects for this season.  They are both derivations on a theme; Greene & Greene frames that is.  The first are two picture frames for some prints we bought on trip to Ireland last year (Dyami was kind enough to reference it one the projects he recently completed for his Dad).  The other one is my Christmas gift to friends and family.  I used the same basic design (ref. Popular Woodworking #187 and “The Woodwhisperer’s” holiday calendar frame project) to build four G&G calendar frames.  All of these frames are from African mahogany with ebony plug accents.  All the joinery was done using Festool Dominos.  This used up my last stash of African mahogany.  And from now on I’m using real stuff.  Despite any snide comments from Shannon or any hand-tool enthusiast, African mahogany’s best friend is a drum sander.


On anther note, it has come to everyone’s attention that WIA 2012 will be held in two locations this year, Pasadena, CA and its old stomping grounds in Covington, KY.  I agree with most everyone in the blogging community that this may split the community.  Anyone who has been to a WIA or two knows the best part is reuniting with old friends and meeting new ones.  Sure the classes are great and the Marketplace is superb, but the best times are getting together talking shop, life and beer (not necessarily in that order).  So yeah, I want to go to the one where the cool kids are; but I fear that the east-coasters and west-coasters will spilt and that trolley will only be half-full next year.  Please visit modernwoodworkersassociation.com to add your two cents.

Thanks for stopping by,

TexWood

Saturday, November 12, 2011

Four Uncommon Woodworking Products

This post is about four products I find indispensable for my shop that you will never find at Woodcraft or Rockler. 

 
First up is “Wurth Brake and Parts Cleaner”.  I’m sure we have all had our battles with the packing grease or cosmoline that is slathered on all those new tools when they arrive in our shops.  Wurth Brake and Parts Cleaner cuts through and dissolves that gunky mess like butter on a hot skillet.  But unlike other brands of Brake and Parts Cleaners, this formulation by Wurth will not eat through paint.  I use this stuff on almost every new cast-iron/metal tool that comes through my shop.  The only downside is that unless you live in California, I doubt you will find it at you local auto parts dealer.  I discovered this product a few years ago from a mechanic friend of mine and quickly put in an on-line order for a case of it.

Next up is an oil-painting palette knife.  I use this for cleaning up glue squeeze-out, mixing up and applying wood filler.  I find the palette knife much better and easier than using a chisel to clean-up glue squeeze-out. 

It also excels at mixing and applying wood filler.  I’m sure most of you have never had to use the stuff on your projects.  But for mere mortals like myself - when I do use wood filler, I prefer Timber Mate. I have three different colors and a number of Transtint dyes.  When I’m done milling my stock for a project, I take one of the cut-off pieces, put some gouges in it, and mix a three to four different “colorations” of the Timber Mate using precise and repeatable measurements.  I then finish the piece using the same finish I will be using for the project.  I can then see which coloration matches best (usually its best to go a little darker).  So if I end up needing to use some filler, I know exactly which mix is going to give me the best results.

Palette knifes are available at any arts supply or craft store and are very inexpensive.  Lee Valley sells them too.

The next item is a coffee stirrer from the chocolate shop at the Bellagio Casino in Las Vegas.  This stirrer has a round paddle at the bottom and is great at stirring those quart and smaller sizes of finish containers.  I usually find myself in Vegas at least once per year for one reason or another.  When I’m there I make a point to go by the Bellagio Casino a couple of times, have a cup of coffee or hot chocolate, and stock up on a few stirrers.

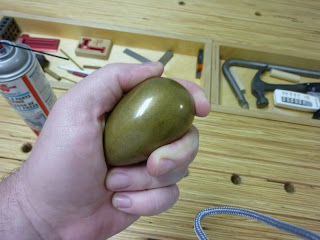
Last, but by no means least, is my brass egg paperweight.  It’s is made of some sort of brass alloy and is unusually heavy for its size.  It has a flat-side on the bottom, a rounded one on the top, and fits my hand like a glove.  I use it exclusively as a small chisel mallet when making fine controlled cuts.  I have tried those small brass mallets you can really choke-up on.  While they work great, I still prefer my brass egg.  The big downside is that I do not know of a source for the paperweight.  I received it about 12 years ago when the company I work for was sending everyone to Covey Leadership Training.  This was part of the gift bag when you completed the course.  If anyone knows of a source, please let me know.

Please comment below if you have any questions or would like to share your uncommon woodworking products.

Thanks for stopping by,

TexWood

Saturday, October 22, 2011

WIA 2011 Haul

Well to say that “Woodworking in America” (WIA) 2011 was nice woodworking respite maybe a misnomer considering the crowd I ran with during the event.  It certainly was fun.  The best part was meeting up with on-line friends I met last year and meeting new friends attending this year’s WIA.  I just hope the APB runs out before WIA 2012. 

The second best part of WIA for me was the Marketplace.  Where else can you actually see and try the tools you see on-line and in the magazines.  Anticipating the deals, I saved my pennies and cashed-in at the event.  And now that UPS has made their deliveries - pictured below is my WIA 2011 Haul.


Going clockwise from bottom right I bought the following items:

1.         Veritas Inset Vise – I’ll use this in the other side of my split-top bench
2.         Great Bench Dogs Time Warp Toolworks was giving out in the Hand Tool School Booth
3.         Woodpeckers Mini Square
4.         Veritas Bench Blade
5.         Veritas Camber Roller Assemble for the Mk. II Honing Guide
6.         Bridge City KM-1 Kerfmaker
7.         Veritas Skew Jig for the Mk. II Honing Guide
8.         Lie-Nielsen Bronze No. 3 Smoothing Plane with the 55 degree frog
9.         Veritas Skew Rabbet Plane
10.       Knew Concepts Fret Saw with the Elkhead Tools replacement handle
11.       Veritas Plane Screwdriver

While all the toys are great, for those that haven’t made it to WIA yet I strongly recommend it.  It is the preeminent woodworking event on my calendar each year.  Each year it seems established concepts are challenged.  Last year it was Michael Fortune’s class on Bandsaw set-up and the myth of blade drift.  This year, it seems to be Adam Cherubini’s class on nailed furniture and its quite acceptable use in a variety of projects.  But while the classes are great and the Marketplace is dangerous, the best part is meeting new and old friends alike.  Here’s to seeing you there next year!

Thanks for stopping by,

TexWood
Saturday, October 15, 2011

GREENE & GREENE INSPIRED WALL HANGING JEWELRY CABINET


After many moons the Jewelry Cabinet is finally finished and installed.  The materials used are: African Mahogany for the cabinet and interior; Ambrosia Maple for the door panels, drawer fronts and back; Ebony Accents and Pulls; and Brusso and SOSS hardware.  This is one of my own designs, but it was heavily influenced by the G&G Curio Cabinet and The Woodwhisperer's  Gadget Station - both pictured below.  I also need to thank Aaron Marshall for his input and confirmation of my original sketch-up design. 

The first challenge of this project were the proud finger joints for the top and sides.  I used the table saw with 1/4 inch dado blade and some stop blocks on my miter gauge.  I cut the fingers for the top first and then fitted the side fingers to them.  Of course, I made a series of test cuts first.  I also left the sides long in case I screwed up.  That way I could just cut the fingers off and try again.  This is the third project in row I haven't had to "re-make" any parts.  Either I'm getting the hang of this wwing thing (scary) or just lucky.


The second challenge was the interior of the Cabinet.  It has three drawers and an upper center divider; with two Brusso necklace carousels on the right side and two adjustable shelves on the left side.


Because of the clearance required by the SOSS hinges, I bascilly had to build a box inside the cabinet to hold the drawers.  In buiding this interior box, I decided to use the proud finger joints again to provide some visual interest.


Since the G&G style can be described as somewhat masculine, I used the Ambrosia Maple to impart little feminine touch to the Jewelry Cabinet.  In that regard, the maple was used for the drawer fronts which are finger jointed into the sides.  I also decided to add the tsuba detail to the front of drawers with an integrated pull similar to the G&G Curio Cabinet.


Some other details I would like to highlight are (1) the Base - which will allow this Cabinet to be placed on a table, dresser, or stand, if one wishes; (2) the  magnetic catches and ebony door stops on the center divider; and (3) the door pulls (once again inspired from Marc's Gadget Station).


If you have any questions or comments (good or bad), please comment below.

Thanks for stopping by,

TexWood